Photoshop Post Production Tutorial for Photo Manipulations
In this Post Production Tutorial I am going to show some of the key points on producing an image. You can spend hours finding the right model, atrezzo, composition, mixing everything up… But if you forget about giving the right atmosphere to your artworks, you’re missing one of the key points: to give an atmosphere to what you are creating.
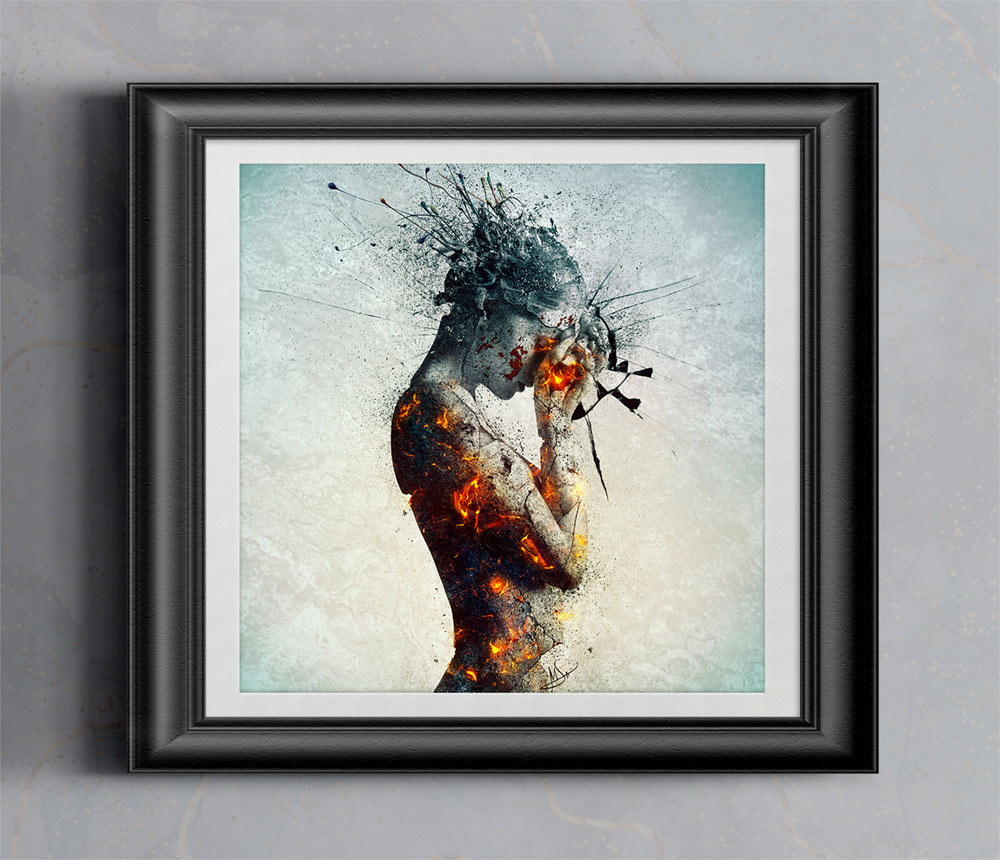
Everything started when I was asked by Aermid, deviantArt Photo Manipulation Gallery Moderator, to write a brief article with tips for Photo Manipulators for the compendium “Manip Academy” that will include also great tips by other photo manipulators such as Marcela Bolívar or Erik Schumacher, and my idea was to create a small list of tips in atmosphere and post production using my piece “Betrayal”, which sums up pretty well most of my post production techniques.
Creating atmospheres is something very personal and each one of us have a way to achieve that, but there are some basic techniques I’d like to share with you all. I encourage you to take them as a starting point and then discover your own depending on your personal style. Here we go!

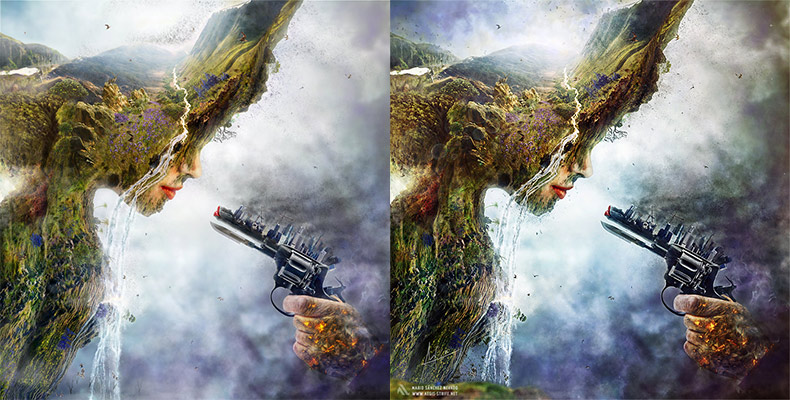
Basic image without post production
Basic Post Production Tutorial Refinements
Lighting range
Lighting is the key point in photo manipulation. You must avoid absolute blacks and whites and find the middle value (unless it’s your intention to do so for an expressive purpose) and get a more balanced and eye-friendly image. You can use several tools to achieve this depending on how your image looks like before final post-production.
Shadows/Highlights, under the Adjustments menu in Photoshop, is my all-time favorite tool. It allows you to mute absolute blacks and white and bring them to the middle lighting range area.
Negative blurring: Stamp all visible layers (Ctrl/Cmd + Alt + Shift + E), Invert (Ctrl + I), Desaturate (Ctrl/Cmd + U)and apply a Gaussian Blur of your choice, then switch to Overlay Blending Mode and adjust the Opacity to your liking. The effect is similar to Shadows/Highlights.
Black & White: Use this Adjustment Layer to emphasize some areas of your lighting range. Not recommended if your image has already burnt areas.

The image with fixed lighting.
General tone and color
Selective Color: This Adjustment Layer is a must to achieve a correct tonal range and to show the colors you really want. You can fine tune any tonal range from here. A personal tip, try to increase the Blacks of your two main colors. Sometimes it may add some depth depending of your basic color range.

Color enhanced, but not finished yet!
Advanced tips
Blurs
Use Stamped Visible Layers with Gaussian Blurs switched to Screen and/or Soft Light (I recommend using both) to enhance the overall atmosphere of the images.
Small details
Before publishing your image, ask yourself some questions about the context, surrounding and ecosystems contained in your image. Maybe you might have forgotten some tiny elements that can bring some realism, like air particles, depth of field, and so on.

Depth of field and details added.
Advanced tone adjustments
Gradient Maps
Use these Adjustment layers to switch the overall tonal range of the image. I recommend to use harmonic and complementary colors (i.e.: yellow + purple) and switching to Overlay or Soft Light.
The Difference trick
Fill a blank layer with a color of your choice and switch to Difference Blending Mode and set Opacity to less than 10%, then open Hue/Saturation (Ctrl/Cmd + U) and play with the Hue bar until you reach a medium tonal range that you like. This little tip is very useful in regards on what was commented on the first point about Lighting, but we use colors instead of light to achieve that.

Betrayal
And we are done! As you can see, the steps in this Post Production Tutorial are very simple to follow. I’m sure you can adapt them to your own work space and way of illustrating.
What about you?
Do you have any specific tips for post-production? Do you think that any of these steps can be done in an easier way? Leave us a comment and let’s enrich each other!


Kurt Langer
Really do love this picture!
Yolanda González Santos
Mi favorito U0001f60d
Adrienne Aiken
Love this piece. Thank you for the insight. Mind you picture 1 with no enhancement is still ridiculously awesome!!
RobinMilford
Wow. What a design it is! I love this photography. And I hope you must continue your photo manipulation jurney for us.